Just Get Me to The Sample Builds Pls
Level 1-49 Sample Builds
![]()
![]()
Character Build Guide/Level 1-49 Sample Builds
These sample builds are intended to help new players with getting through the early outposts, and reach Secronom Bunker. Level 49 is the last point at which you can use your free starter Stat Reset; it is recommended to review your build at that point and use the Stat Reset to optimize, or switch to another weapon set altogether.
Character Building Past Level 50
![]()
![]()
![]()
Character Build Guide/Level 108+ Sample Builds
Stat gain slows down massively from level 50 onward, with you only gaining 1 stat point and 2 proficiency point (up to level 220)/1 (level 220+) per level up. On the other hand, by this point you should be able to use 2 weapon categories at 120 proficiency and comfortably meet their Critical Hit/Accuracy/Reloading requirements. Thus, Endurance and Dexterity become the stats to raise, increasing your survivability and DPS respectively.
The aforementioned sample builds show what your character should look like at level 108, when you are able to raise your 3rd weapon category to 120 proficiency. There will undoubatly be oddball weapons that require more or fewer stat points than the sample builds suggest, and your experience might clash with the suggested Accuracy/Reloading/Endurance investment - it is ultimately up to you to decide how to spend your points, and how your final build will look like.
More Links
DFP Stat Calculator - A powerful calculator that automatically calculates the amount of stat available based on level and profession, allowing you to play around with stats and visualize your character build. Use this to plan out your stats for later levels.
DFBuddy Boost Calculator - This tool (provided by Clayton), allows you to calculate total boosts from implants and drugs.
General Information
Explanation of Stats
Read more on Stats and Levels.
- Equip Stat: Requirement to wield certain weapons and armors.
- Strength: Also increases damage dealt with Melee Weapons (not Chainsaws). Notable breakpoints are:
- 30: Requirement for most high level SMGs.
- 50: Requirement for high level Chainsaws, Shotguns and Assault Rifles.
- 100: Requirement for high level HMGs and armour, the maximum.
- Weapon Proficiency: Boost your proficiency in order to access more powerful equipment along the path you are upgrading. Wielding weapons above your current proficiency will incur significant penalties to accuracy and reload. Proficiency does not increase the damage of weapons. Weapon proficiency does have some "breakpoints" for major upgrades:
- 30: Most level 5 craftable weapons (ex: Super Slugger, CK 75 Auto, Huntsman XP12...)
- 60: Most level 10 craftable weapons (ex: Skull Splitter, SlamFire S4 Compact...)
- 120: SB/SEZ area weapons
- 130-135: RR lootable weapons
- Strength: Also increases damage dealt with Melee Weapons (not Chainsaws). Notable breakpoints are:
- Non-equip Stat: Boosts your character's survival ability and weapon performance.
- Endurance: Allows you to take more damage, and sprint longer. 51 Endurance will allow you to survive a bite from a Flesh Hound without dying and without armor, if you have full health. Usually raised after Accuracy/Reloading.
- Agility: One of the most important stats, it determines how fast you move, both for sprinting and for walking. It's often recommended that players max this first or after 55 base Critical Hit.
- Accuracy: Determines the spread of your firearm. Without sufficient accuracy, firearm strength does not matter as you can't hit anything in the first place. Different weapon types require different levels of Accuracy investment.
- Critical Hit: Due to Criticals dealing 5x the damage of a regular attack, Critical Hit is likely the most important stat for builds using looting weapon (read: all builds), or Sub-Machine Guns/Chainsaws for their knockback weapons, as they rely primarily on crits for DPS. Rather than being a random chance, it determines the pattern of your critical hits. The important breakpoints for this stat are:
- 79: Melee, high level Pistols and Rifles
- 112: Sub-Machine Guns, Chainsaws, Assault Rifles
- 114: Heavy Machine Guns
- Reloading: Self explanatory, it determines how fast you reload your firearms. Without enough of it, you will quickly get overwhelmed if you are using a weapon with a low capacity. Becomes less relevant later on as gun capacity increases, but players still regard it higher value than Accuracy overall. Low Capacity endgame weapons such as the Crossbows and Bucktooth Blaster also benefit greatly from max Reloading.
- Dexterity: Provides multiple small benefits, most importantly an increase in attack speed; the boost is greater the lower the weapon's base attack speed is. Should be raised after you have met the Accuracy/Reloading requirements for your chosen weapons.
- Survival: Makes you harder to spot, reduce chance to get random hordes and boosts your Hunger pool. Only relevant at higher levels, when you have acquired the most powerful weapons available and cannot upgrade further.
What Stat to Add First
In order of importance, stats generally follow the bellow pattern:
Agility ≈ Critical Hit > Strength > Reloading > Accuracy > Endurance ≈ Dexterity > Survival
You should try to raise your stats in this order:
- Prioritize getting both Agility to 100 and Critical Hit to your looting weapon of choice's breakpoint. Newcomers are recommended to max Agility first before Critical Hit.
- Strength and Critical Hit should next be raised to your crowd control weapon's requirement the exact moment you have enough proficiency to equip it, with no point to spare. Later on, spare points can be put into Strength to boost your Melee Weapons' damage.
- Reloading should be prioritized next, especially in midgame as most weapons then have low capacity. Accuracy can be raised later, as most weapon types can handle lower level zones well with only Accuracy bonus from MC weapons.
- Shotguns require up to 50 Strength and lots of Reloading. Accuracy is also a concern, due to the pellet spread on top of normal weapon inaccuracy.
- Sub-Machine Guns require only 30 Strength and 112 Critical Hit, and can work with little Accuracy. Reloading is not a major concern due to their Very Fast reloading speed.
- Assault Rifles require up to 50 Strength and decent Reloading; its high accuracy stat minimizes the need for stat investment. 112 Critical Hit is a welcoming investment to boost its average DPS.
- Heavy Machine Guns require up to 100 Strength and high Accuracy, but don't need a lot of Reloading due to their high capacity.
- Grenade Launchers only need a decent amount of Reloading to counteract their low capacity in early to mid game.
- Chainsaws require 50 Strength and 112 Critical Hit. Accuracy and Reloading are irrelevant.
- Endurance becomes more useful in later zones as zombies and bandit fires become harder to dodge, especially for Non-Strength Armour users. Try to raise Endurance to ~50 when you reach level 50.
- Dexterity becomes a reliable filler stat for extra DPS later on, and should raised after getting sufficient Accuracy/Reloading. Survival is raised last, mostly to increase your Hunger pool for long grind sessions.
Weapons and Armor Mastercrafting
Frequently, you will see higher level players with stats (usually Agility) higher than the maximum of 100 that can be acquired by leveling up. This is achieved by using mastercrafted weapons and gears:
- Weapons can be mastercrafted up to a maximum of 8/8/8 (+8 Accuracy/+8 Reloading/+8 Critical Hit), for a total of 24 for 3 weapons.
- Armor can also be mastercrafted up to a maximum of 24/24 (+24 Agility/+24 Endurance). Armor endurance acts as damage reduction to simulate an HP increase equivalent to the gained Endurance; see Stats_and_Levels#Endurance for more information.
- Stat increase applies even if you are not actively using the weapon, or if your armor is broken. For this reason, it is recommended to bring "stat boost" weapons and armor to fill in empty equipment slots, even if you would never use them in combat.
Weapon and armor mastercrafting are very important, as they greatly improve the performance of your survivor just by being equipped. The 2 most important stats to note regarding mastercrafting are:
- Critical Hit: Always try to get weapons with 7 or 8 in Critical Hit, if possible. All build guides on this page assume that you get 8 Critical Hit on all weapons.
- Agility: Any increase in agility is appreciated, but generally, try to get 20-24 Agility on your armor. As a result, armors with lopsided Agility MC will always sell higher than ones with lopsided Endurance MC; a good Endurance MC can still help survivors with low Endurance base however.
Weapon Masteries
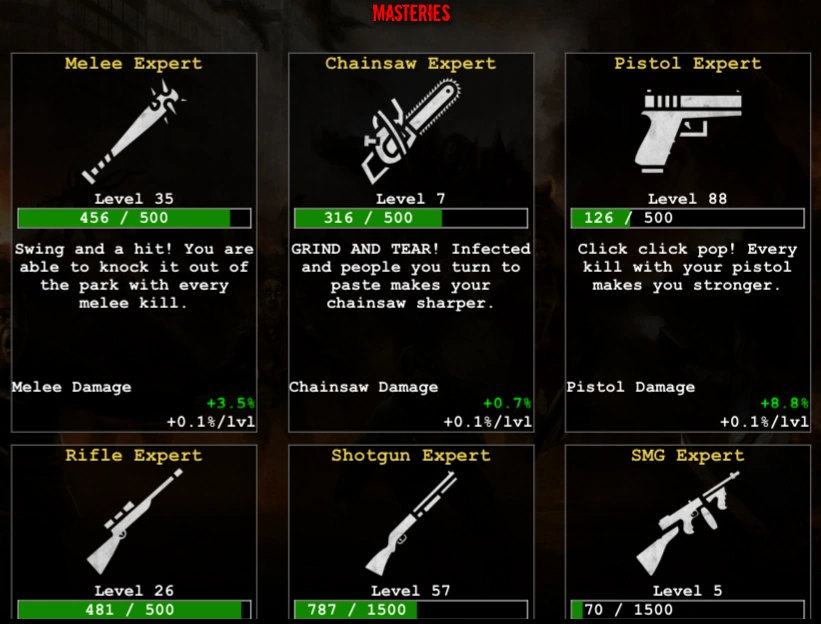
Weapon Masteries allow you to gain bonus damage for a weapon category by using it to kill zombies. The bonuses max out at 20% per category, meaning that a well trained category with high mastery level will have a noticeable advantage over an untrained one.
As a result, when you are looking for a weapon upgrade, it is recommended to stick to the categories you are already using rather than use stat resets to swap to new categories.
An Introduction to The DF Build Framework
With 3 weapon slots available, it is important to find weapons that each can fulfill a different tactical role in order to deal with as many situations as possible. As a result, regardless of where you ask for build advice at, almost all builds recommended will use the following framework:
- Looting Weapon
- Crowd Control Weapon
- Utility Weapon
This guide will not attempt to suggest using a certain weapon type over the others; rather, you are intended to select a weapon type from each category, then head to the Sample Builds sections to get an example on how to raise your character.
Looting Weapons
Looting weapons will be your mainstay weapon in this game. They are primarily used to move quietly in between loot spots, protect yourself while travelling, and cost efficiently kill bosses and bandits. The last use is only recommended if you can isolate the targets by using fences/walls or backpedaling to leave the aggro behind, or group up in multiplayer.

- Melee Weapons: The only truly silent weapons in the game (if not counting LE crossbows). They can be used to dispatch any enemy in the game without using ammo, alerting nearby zombies, or triggering zombie explosions. However, certain zombies with long range (Reapers, vomitters) or instant kill attacks (Leapers, Harvesters), and Sirens can be tricky to take down with Melee Weapons. Additionally, due to their lack of range, Melee Weapons fare poorly in situations with large zombie count; for example, fighting bosses or bandits supported by event aggro, especially in Multiplayer.

- Pistols: One of the 2 options for quiet ranged weapons. Pistols offer safety from afar at engaging multiple enemies and sniping bosses/Bandits, at the cost of potentially alerting zombies with every shot. Keep in mind that they will be somewhat weaker than Melee initially, due to the added Accuracy/Reloading requirement.

- Rifles: Early Rifles have decisively higher DPH/DPS/capacity than Pistols, at the cost of more expensive ammunition. However, these differences gradually decrease as you go up in proficiency. At 100+ proficiency, their DPS potentials and stat requirements become equal, and the choice largely comes down to personal preference:
- Pistols fire quickly at lower DPH, meaning that they will alert zombies more quickly, but also handle large fights better with their higher KB power/stagger. Pistols will kill weak zeds faster than Rifles, and with sufficient damage boost, can also outrace Rifles at 1HKOing tougher enemies.
- Rifles usually fire more slowly with high DPH. This allows them to 1HKO high HP zombies with minimal damage boost, noise and ammo usage, making them cost efficient choices for looting in zones with inflated zombie HP (SEZ/RR).
Crowd Control Weapons
Knockback weapons are what you want to use when you are put in a situation that you can not handle with either your looting weapon, or explosives. If your back is to a wall, and you've got zombies coming from all sides, these weapons are going to be your best friend. Most weapons in this category also function well as grinding weapons that are less cost efficient and slower, but safer than explosives.
These weapons can be used to kill bosses in single player as well as multiplayer, and while chainsaws may not be very good for this role, it can be done if you get the boss by itself like with looting weapons.

- Chainsaws: Stat efficient weapons that engage enemies at melee range without the need for ammunition. Chainsaws also have a low rate of horde generation, allowing them to be used in loot runs with few worries. On the other hand, Chainsaws are difficult to handle in later zones starting from Secronom Bunker, and are largely ineffective against most bosses or in Multiplayer.

- Shotguns: Shotguns deal high damage at close range, but have high spread and damage falloff that hampers their effectiveness against faraway targets. While normally effective and ammo efficient at fighting hordes and bosses, Shotguns are also prone to popping ambushing explosive zombies such as Green Rumblers due to their high damage per shot.

- Sub-Machine Guns: Mid-range weapons that offer a balance of stat requirement, range, ammo efficiency and knockback power. SMGs have a slight damage falloff at long range that, while not to the extent as Shotguns, still discourage using them against faraway target. SMGs also struggle slightly at grinding as the crit mechanic may cause unwanted overkill, wasting damage that could have otherwise been converted to EXP.

- Assault Rifles: With pinpoint accuracy rivaling Rifles and no damage falloff, ARs are the ideal weapons for killing bosses and exploding zombies from a safe distance. ARs are also passable for grinding purpose, but normally struggle to control crowds due to their lower knockback power.


Utility Weapons
From level 49-50, you will have the ability to put proficiency points into a 3rd weapon category, in preparation for level 108 when you can have 3 categories at 120 proficiency. An utility weapon should ideally confer an unique ability that your other weapons lack, or cover their shortcomings. These are the most common choices:
- Grenade Launchers: Can deal high DPS and KB against large hordes, supporting weapons that cannot spread KB among multiple zombies well such as Assault Rifles. Alternatively, can slowly but safely kill horde through walls in indirect fire mode.
- All build guide examples will assume Grenade Launchers as the default for 3rd slot.
- Flamethrowers: Can deal very high DPS against hordes, helpful for grinding in the Wastelands. Their lack of low proficiency models, low DPS against single target, and mediocre KB/lack of stagger capability against crowds prevents them from being used as primary CC weapons.
- Melee Weapons: Can silently dispatch zombies, evade Sirens in case you do not want to risk noise from Pistols/Rifles, and kill exploding zombies at close range without triggering their explosions.
- Chainsaws: Can fend off hordes cost effectively, especially in Raven Ridge where fast exploding zombies can be risky to take out with firearms.
Recommended Stats For Weapon Types
In order for your weapons to function properly, you should try to get your Critical Hit exactly to, and other stats close to these values:
- Slash values (74/99) indicates that the weapon category has different Critical chances, high level weapons typically have the higher chance and thus use the lower value.
- Accuracy range (80-119) indicates recommended minimum to the highest effective maximum.
- Reloading values are calibrated for 1 second reloading time, but may be adjusted according to weapon capacity and personal preferences.
| Recommended Stats | ||
|---|---|---|
| Base Stats | Boosted Stats (+24 MCs) | |
| Melee | 55 Critical Hit | 79 Critical Hit |
| 100 Stealth | ||
| Chainsaws | 50 Strength | 50 Strength |
| 88 Critical Hit | 112 Critical Hit | |
| Pistols | 35-55 Accuracy | 59-79 Accuracy |
| 55 Critical Hit | 79 Critical Hit | |
| 50/75 Reloading | 74/99 Reloading | |
| Rifles | 35-55 Accuracy | 59-79 Accuracy |
| 55/88 Critical Hit | 79/112 Critical Hit | |
| 75 Reloading | 99 Reloading | |
| Shotguns | 50 Strength | |
| 56-95 Accuracy | 80-119 Accuracy | |
| 75 Reloading | 99 Reloading | |
| Sub-Machine Guns | 30 Strength | |
| 88 Critical Hit | 112 Critical Hit | |
| 56-95 Accuracy | 80-119 Accuracy | |
| 50 Reloading | 74 Reloading | |
| Assault Rifles | 50 Strength | |
| 35-55 Accuracy | 59-79 Accuracy | |
| 88 Critical Hit | 112 Critical Hit | |
| 63 Reloading | 87 Reloading | |
| Heavy Machine Guns | 100 Strength | |
| 88 Critical Hit | 112 Critical Hit | |
| 100 Accuracy | 124 Accuracy | |
| Grenade Launchers/ Flamethrowers |
56-95 Accuracy | 80-119 Accuracy |
| 75 Reloading | 99 Reloading | |
Choosing Your Armor
Armours are split into 2 types:

- Non-Strength Armour (aka Meshes)
Meshes do not have any Strength requirement to wield, thus you can wield the strongest ones right away from level 1. They also confer a +5% Movement Speed boost, which can only be obtained from expensive implants otherwise. On the other hand, they are less durable than Reactive and also offer lower absorption, requiring you to put a few points into Endurance to not go critical before they break.
Given that most weapon categories only require up to 50 Strength to wield, Meshes are going to be the primary armors for most players up to around level 120+. Afterwards, while it becomes possible to get 100 Strength while not sacrificing weapon performance, Meshes can still be competitive thanks to their passive speed boost.

- Strength Armour (aka Reactives)
Reactives are far superior to Meshes in both durability and absorption level; endgame Reactives with a good MC are capable of fully protecting a base 25 Endurance character until they are broken, without the character even going into Critical.
The catch is that, all Reactives require up to 100 Strength to use. Thus, Reactives at lower levels are only seen in builds with HMGs, highly not recommended due to HMG's high Accuracy requirement. At high level however, Reactives become the go-to armor for most players, allowing them to survive great amount of hits from bandits and endgame zombies, as well as blows from gargantuan bosses like Charred Titans and Devil Hounds.
- Generally, you should always choose weapons first, then choose armor depending on what build you are using with. Regardless of the build however, it may be worth it to carry at least one of each type of armour on you at all times to allow for more flexibility.
Implants
Implants provide small boosts to the character's abilities, which build up to become significant as you level up and acquire more implant slots. They become an important part of the grind beyond Secronom Bunker, as zombies become too powerful for vanilla character stats to handle.
The major types of implant boosts, ordered by importance, are:
Always Useful
These implants provide impactful bonuses regardless of situation, and are thus always worth buying.

- Speed Boost: Just like how Agility is the most important stat, Speed Boost is the most powerful implant boost for allowing you to more easily dodge zombie attacks. Speed helps you with everything, from looting, grinding, farming bosses to travelling between outposts and doing missions.

- Offensive Boosts (Damage/Attack Speed boosts): The second way of increasing your survivability is to boost your zombie-killing speed, and these will help you with that. Even in looting situations, a decent amount of Damage boost is needed to 1-2HKO zombies, minimizing the commotion from killing zombies and helping you at clearing the path between loot spots.
Occasionally Useful
These implants are helpful for developing your character, but close to useless outside of the activities they are designed for. Consider renting over buying these implants, as renting only requires a fraction of MP price as rentals and provide more flexibility.

- Loot Boosts (Weapon/Armor chance boosts, Ammo/Cash amount boosts, Search speed/Loot spots...): Represent an investment in your looting capability. High loot boosts paired with GM greatly your income from looting in SEZ/RR, allowing purchase of even more implants and powerful gears. Has no effect when you are farming bosses.
- Keep in mind that looting only pays out if you have sufficient speed/damage/weapons to survive the zone in the first place.

- EXP Boost: Increase the speed at which you level up, allowing you to gain more stats/proficiency points and implant slots.
- Damage boosts can also increase your EXP gain by making you kill zombies faster, as long as the extra damage is not wasted on overkill. Theoretically, the highest EXP gain is achieved when your total damage boost is equal to total EXP boost.
- Expert players plan their grinding by first check their weapons and zombie HP in the grinding area, then calculate the highest available damage boost that results in minimal overkill, and finally fill the remaining slots with EXP boosts.
Niche

- Incoming Damage Reduction: Reduces damage taken by a flat amount (before absorption from armors). Usually seen as a flex, as there are many far more practical ways to increase survivability, such as improving your speed and dodging skills, carrying multiple armors/extra heals, utilizing terrain to wall off zombies, or using weapons with better KB power.

- PvP Point Boost: The only thing that matters in the Arena, as all players receive equal stat boosts there. Has no effect in PvE, obviously.
Venditron Implants
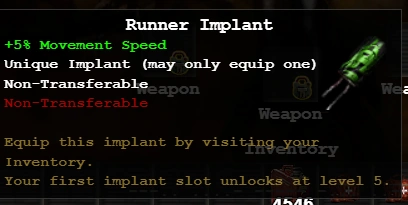
Venditrons in all outposts house a collection of unique implants (you can only equip one instance of each unique implant at the same time). In addition to their tutorial role, these implants are quite powerful on their own, having power level comparable to Err X- implants at a fraction of the price. As a result, it is recommended to check the Venditron of every new outpost and purchase/equip these as soon as possible.
For a comprehensive list, see Implants#Venditron_Implants.
Professions Recommendation
For a briefing on professions, read Professions#Brief_Analysis
- Role-Playing Professions are overall recommended for main accounts, as they gain EXP, and thus levels and implant slots, far faster than other professions.
- The Student and Musician professions sacrifice a small amount of EXP bonus compared to the standard +30% RP for large amount of stats, while still being way ahead of others in EXP gain. It is up to you to determine whether or not this tradeoff is acceptable.
- Production/Service Profession are for versatile alts that can make extra money through the Marketplace, as well as provide bossing and sales slot utility. Compared to production professions which only need to be logged in once per day, service professions require actively monitoring the marketplace and procuring food, but provide greater reward when properly cared for.
- The Engineer is the most powerful of the service production. They are appreciated in both looting and grinding zones, and also capable of converting scraps into valuable Repair Kits.
- The Farmer and Scientist provide the greatest benefit of all production professions.
- Stat Booster Professions are jack of all trades that can be used for bossing alts as well as main accounts. As they lack the utilities of unlocking implant slots or providing Marketplace services and goods, they are relatively unpopular.
- The Athlete stands out the most with its +15% Speed. It a great option for F2Ps that struggle to buy speed otherwise, and bossing alts that want to survive better in Multiplayer bossing instances.
- Most stat booster profs come with large boosts in specific weapon categories. These are overall inferior to roleplaying professions EXP bonuses for main, but for alts these are somewhat helpful for killing bosses quickly.